Wednesday, May 18, 2022

Cypress for Web Automation - Part 1 - Introduction & Installation

 Cypress Introduction

Official website - docs.cypress.io

Cypress is a JavaScript based testing tool implemented for testing front end web applications. It addresses pain points faced by automation testers such as handling AJAX calls, synchronization, handling waits etc. Cypress can be used to test anything running in a web browser. Since it runs on a real browser, it can work without needing to have driver binaries. 

Cypress Architecture

As shown in the image below, cypress is handled by node server. However, the cypress code runs along side the application code inside the browser (both are running in iFrames), it can access anything inside the application. This allows cypress to mock JavaScript of a webpage or change the JavaScript object on the fly. The cypress inside node server acts as a proxy and uses HTTP requests to manage the tests running inside the browser.


Some advantages of Cypress
 
  • Easy to setup as it does not need driver binaries
  • It has built-in waits. Therefore no need to implement waits for tests
  • Access and change JS code on the fly
  • It has a dashboard for reporting
  • Supports parallel execution
  • Screen grabs to show how tests are executed. (Easy to debug)

Setting up Cypress in a Windows machine

Install node JS in your machine

Use the Download | Node.js (nodejs.org) link to download and install node JS.

Once installed, launch command line and run node -v to see if it has been successfully installed.


Install Cypress using npm install in your machine

Enter npm install cypress --save-dev in the project folder to install cypress.


Open project using visual studio code

File > Add Folder to Workspace

Use .\node_modules\.bin\cypress open in terminal to start cypress. (If this is your first time starting cypress, expect a slight delay before you see cypress test runner)


Then cypress test runner will be opened.


Then cypress folder structure will be created. Open visual studio code project to see the folder structure created.


Copy the following to package.json file

"scripts": {
    "cypress:open": "cypress open"
  }


Then save the changes.

Now you can run npm run cypress:open and launch cypress test runner.


Sunday, June 28, 2020

Committing Test Suite to Remote Git Repository

Once GIT and GITHUB installed in your machine, follow the given steps to commit your test suite to GITHUB.


1) Navigate to test suite folder location via Command Prompt and enter command git init.

Add caption

2) Then type git status  to see the current status of files of your test suite.


3) Add all files in your test suite to be committed to git repository using git add . command.


4) If you type git status again you would see all files are now in staging state highlighted in green.


5) Now commit all files to local git repository using git commit -m "<message>".


6) Once local repository commit is successful, create a repository in github to commit your local repository to remote repository.

Then use command git remote add origin <remote repo url>
Then use git remote -v


7) Finally commit local repository to remote repository using the command git push -f origin master.


8) If commit is successful, navigate to remote repository and check if all files are available.


Wednesday, May 27, 2020

Cucumber Selenium test automation framework using C# - Part 8 - Attaching Screenshots to the report

Prerequisites


Please complete Part 7 of this tutorial before continuing.

Adding screenshots to test report using Extent Reports


1) In order to maintain multiple screenshots before adding them to the report, we need to add a public class in Utility package and name it as StepImageContext and add the following content to it.

public string StepInformation { get; set; }
public string ScreenshotPathWithName { get; set; }


2) We need to have a method to capture screenshot and save in given location and another method to add screenshots with step information into the instance of StepImageContext list. Add these two methods as given below.

3) After adding above methods, navigate to Hooks.cs class and create a method to add screenshots to log. We need to check if StepImageContext instance is empty. Attaching screenshot to log should be available only if at least one screenshot is added. Also create another method to add screenshot to the log when there is a failure.

4) Next step is to call the screenshot capture method (LogInfoWithScreenshot) to all the places step information is added as given below. Do not add this method to Step definition pending section.

5) At the end of the AfterStep() method, clear the current scenario context.

6) Once you complete that, define an object of StepImageContext and add screenshots as required. A sample is shown below. Make sure to add screenshots for each step.

6) Rebuild the code and execute the test. In the report you should see added screenshots.

Monday, April 13, 2020

Cucumber Selenium test automation framework using C# - Part 7 - Adding a test report with logs

Prerequisites


Please complete Part 6 of this tutorial before continuing.

Adding a test report using Extent Reports


1) Install 'ExtentReports' via Nuget Package Manager


Extent reporting is a html reporting tool which can be used with Cucumber. 

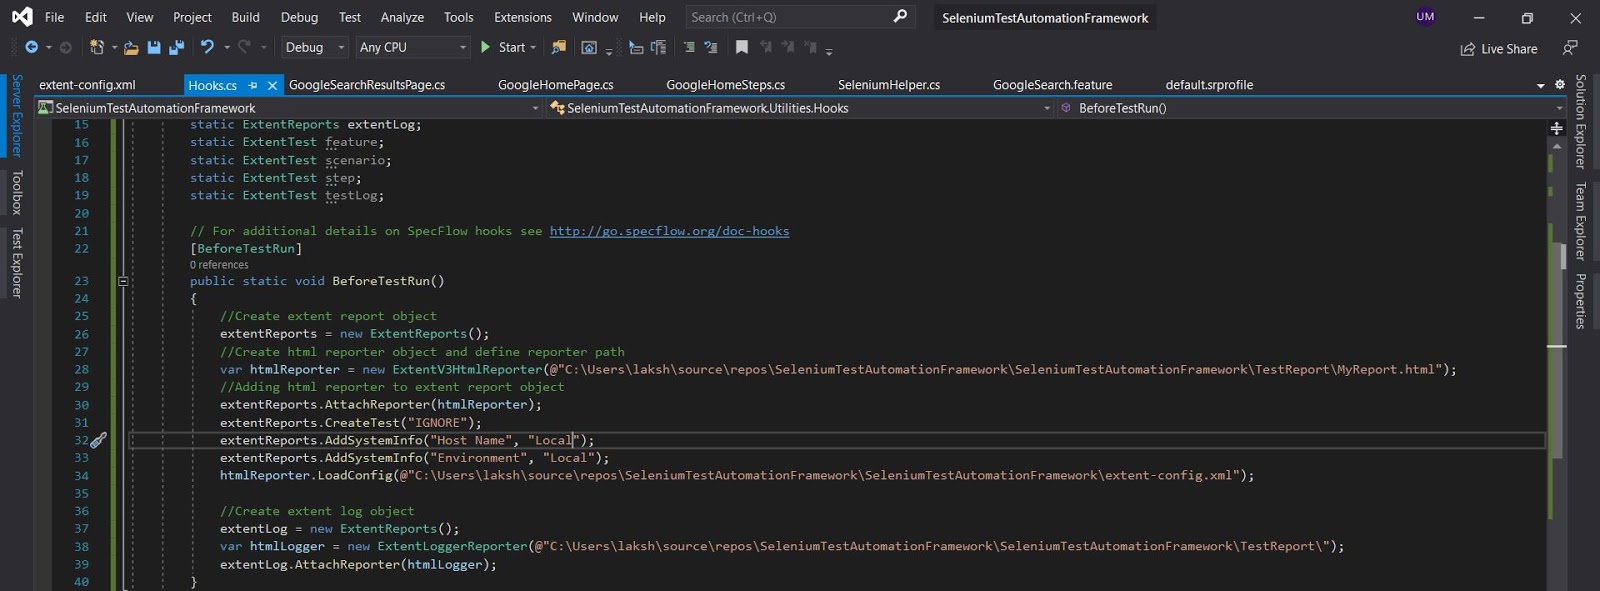
2) Creating the report and closing the report can be done in our Hooks.cs class. In the Hooks.cs class, add BeforeTestRun section.


3) Import following packages.

using AventStack.ExtentReports;
using AventStack.ExtentReports.Gherkin.Model;
using AventStack.ExtentReports.Reporter;

Add a extent-config.xml file to add configurations with following content.

<?xml version="1.0" encoding="UTF-8"?>
<extentreports>
  <configuration>
    <!-- report theme -->
    <!-- standard, dark -->
    <theme>standard</theme>

    <!-- document encoding -->
    <!-- defaults to UTF-8 -->
    <encoding>UTF-8</encoding>

    <!-- protocol for script and stylesheets -->
    <!-- defaults to https -->
    <protocol>https</protocol>

    <!-- title of the document -->
    <documentTitle>Test Automation Report</documentTitle>

    <!-- report name - displayed at top-nav -->
    <reportName>Test Automation Report</reportName>

    <!-- timestamp format -->
    <timeStampFormat>MMM dd, yyyy HH:mm:ss</timeStampFormat>

    <!-- custom javascript -->
    <scripts>
      <![CDATA[
                $(document).ready(function() {
                    
                });
            ]]>
    </scripts>

    <!-- custom styles -->
    <styles>
      <![CDATA[
                
            ]]>
    </styles>
  </configuration>
</extentreports>

4) Add the implementation as given below.


5) Add the closing of report to the AfterTestRun method.


6) Add feature information to the report


7) Add scenario information to the report


8) Add step information to the report

var stepType = ScenarioStepContext.Current.StepInfo.StepDefinitionType.ToString();
            PropertyInfo pInfo = typeof(ScenarioContext).GetProperty("ScenarioExecutionStatus", BindingFlags.Instance | BindingFlags.Public);
            MethodInfo getter = pInfo.GetGetMethod(nonPublic: true);
            object TestResult = getter.Invoke(ScenarioContext.Current, null);
            if (ScenarioContext.Current.TestError == null)
            {
                if (stepType == "Given")
                {
                    step = scenario.CreateNode<Given>(ScenarioStepContext.Current.StepInfo.StepDefinitionType.ToString() + " " + ScenarioStepContext.Current.StepInfo.Text);
                }
                else if (stepType == "When")
                {
                    step = scenario.CreateNode<When>(ScenarioStepContext.Current.StepInfo.StepDefinitionType.ToString() + " " + ScenarioStepContext.Current.StepInfo.Text);
                }
                else if (stepType == "Then")
                {
                    step = scenario.CreateNode<Then>(ScenarioStepContext.Current.StepInfo.StepDefinitionType.ToString() + " " + ScenarioStepContext.Current.StepInfo.Text);
                }
            }
            else if (ScenarioContext.Current.TestError != null)
            {
                if (stepType == "Given")
                {
                    step = scenario.CreateNode<Given>(ScenarioStepContext.Current.StepInfo.StepDefinitionType.ToString() + " " + ScenarioStepContext.Current.StepInfo.Text).Fail(ScenarioContext.Current.TestError.Message);
                }
                else if (stepType == "When")
                {
                    step = scenario.CreateNode<When>(ScenarioStepContext.Current.StepInfo.StepDefinitionType.ToString() + " " + ScenarioStepContext.Current.StepInfo.Text).Fail(ScenarioContext.Current.TestError.Message);
                }
                else if (stepType == "Then")
                {
                    step = scenario.CreateNode<Then>(ScenarioStepContext.Current.StepInfo.StepDefinitionType.ToString() + " " + ScenarioStepContext.Current.StepInfo.Text).Fail(ScenarioContext.Current.TestError.Message);
                }
            }
            if (TestResult.ToString() == "StepDefinitionPending")
            {
                if (stepType == "Given")
                {
                    step = scenario.CreateNode<Given>(ScenarioStepContext.Current.StepInfo.StepDefinitionType.ToString() + " " + ScenarioStepContext.Current.StepInfo.Text).Skip("Step Definition Pending");
                    step.Log(Status.Skip, "STEP DEFINITION PENDING");
                }
                else if (stepType == "When")
                {
                    step = scenario.CreateNode<When>(ScenarioStepContext.Current.StepInfo.StepDefinitionType.ToString() + " " + ScenarioStepContext.Current.StepInfo.Text).Skip("Step Definition Pending");
                    step.Log(Status.Skip, "STEP DEFINITION PENDING");
                }
                else if (stepType == "Then")
                {
                    step = scenario.CreateNode<Then>(ScenarioStepContext.Current.StepInfo.StepDefinitionType.ToString() + " " + ScenarioStepContext.Current.StepInfo.Text).Skip("Step Definition Pending");
                    step.Log(Status.Skip, "STEP DEFINITION PENDING");
                }
            }

9) Add end report and end log statements to AfterTestRun method.


10) Add logs as needed in project


11) Build and run the tests. Navigate to location where report is created.


12) Open MyReport.html to view test report.

13) Open index.html to view the log.


Sunday, April 12, 2020

Cucumber Selenium test automation framework using C# - Part 6 - Filtering tests using tags

Prerequisites


Please complete Part 5 of this tutorial before continuing.


Filtering tests using tags


1) Before this, add a new scenario to the feature file and implement steps for as given below.


2) Add SpecRun profile to the project as given below. SpecRun profile will be used to add configurations on how the test suite should run. 


3) In the SpecRun profile add the filter tag to filter the scenarios you need to run. Filter can be applied to feature file or scenario.


4) Now build the project and see if test explorer shows both scenarios as given below.


5) Remove or change @google tag on one scenario and then rebuild the project. Navigate to test explorer. Test explorer should only show the scenario with google tag name.


Cucumber Selenium test automation framework using C# - Part 5 - Adding assertions

Prerequisites


Please complete Part 4 of this tutorial before continuing.


Adding assertions for each step


When running a test, assertions help to make sure the application is behaving as per expected behavior. For the test framework, assertions can be implemented using NUnit. 

Navigate back to 'And I'm in google home page' step in GoogleSearch.feature file. In this step before entering a value to search text box, we need to make sure search text box is displayed. Unless the search text box is displayed, user will not be able to enter any text to it. 

Selenium provides a way of waiting until an element is present before carrying out an action on it. 

1) In the SeleniunHelper.cs class, implement the following method.


This method will check an element is displayed in UI for a configured time period. If element is not displayed within given time frame, method will throw an exception. 

Use the method in page object class as following.


Then call the implemented method in step class to check whether element is displayed or not before proceeding to next step.


Similarly, selenium provides many ways of implementing assertions as per requirement.

Friday, March 20, 2020

Cucumber Selenium test automation framework using C# - Part 4 - Implementing step definitions and running tests

Prerequisites


Please complete Part 3 of this tutorial before continuing.


Implementing step definitions


Once project structure is implemented, before running the tests step definitions for each scenario step must be implemented.

1) Navigate to GoogleSearch.feature file and go to Given I've launched Chrome browser step definition.

In this step browser should be launched based on user input. Change the step definition as shown. word chrome is parameterised in step definition and passed to launchBrowser method in SeleniumHelper.cs class.


2) Implement the rest of the step definitions as given below. Leave Then I can see search results step definition as pending for the time being.


3) Please comment the Then I can see search results step in GoogleSearch.feature file as currently it is not required.

Running tests using Test Explorer in Visual Studio


1) Once everything is completed, build the project by selecting Build > Build Solution.

If there aren't any errors, build will be successful.


2) Remove the UnitTest1.cs class from the project as it is not required.


3) In order to run the test in Visual Studio, navigate to Test Explorer. (If Test Explorer is not available, View > Test Explorer will show the Test Explorer window)

Test Explorer will show the available tests. To run the test, right-click on the test and select Run.


If everything goes well, chrome browser will open and test will be executed. Once test is completed, then browser will be closed.


Thursday, March 19, 2020

Cucumber Selenium test automation framework using C# - Part 3 - Creating project structure

Prerequisites


Please complete Part 2 of this tutorial before continuing.


Creating Project Structure


Pages


Since we are using Page Object Model (POM) design pattern in our automation framework, we need to maintain elements and actions of each web page in separate class files. (i.e. If your web application contains 5 different pages, you need to create 5 class files which corresponds to each web page and include all elements and actions for each page)

1) In your solution, create a folder and rename it as Pages. Then create a GoogleHomePage.cs class inside Pages folder. GoogleHomePage.cs class will contain all elements and actions of the GoogleHome page.


2) Import the following libraries to the class.

using OpenQA.Selenium;

using OpenQA.Selenium.Support.PageObjects;

The syntax to be used to define elements

[FindsBy(How = How.XPath, Using = "")]

private IWebElement searchTextBox;

3) Include elements for Search text box and Google Search button in GoogleHomePage.cs class
(For this example I will be using xPath to identify elements)


4) Include actions required in GoogleHomePage.cs class.
(For this example I will be using adding text to search text box and clicking Google Search button)


5) Create a constructor to initialize elements to be identified by the driver.


Features

Feature file is a file which contains one or more scenarios for a particular feature of the system. Feature can be a direct map to a story in a project.

To make maintenance easy, we will create a Features folder in the project and keep all the feature files inside that folder.

1) In your solution, create a folder and rename it as Features. Then right click on the Features folder > Add New Item > SpecFlow > SpecFlow Feature File to add a new feature file. (i.e. I will add a feature file called 'GoogleSearch.feature')


2) The feature file contains generic text. You can edit the file according to your requirement. However the format must not be changed. 

In the GoogleSearch.feature file I want to have the following scenario.

1. Launch Google Chrome browser
2. Navigate to google home page
3. Enter 'Google' in search textbox and click on Google Search button
4. View search results

I have modified GoogleSearch.feature file as given below.


Steps

For every action written in feature file should have a corresponding implementation step to execute the required actions. These steps are included in a steps class. This class is called step definition class. Step definition class can have one or more step implementations. 

Please note that one feature file can connect to step implementations on multiple step definition classes. 

1) To implement step implementations for GoogleSearch.feature, I will add GoogleSearchSteps.cs class inside Steps folder.


2) SpecFlow provides the capability to generate step definitions for each step written in feature file. Navigate to GoogleSearch.feature file > Right Click on any step > Generate Step Definitions.


In the pop-up window, select Copy methods to clipboard option to copy step definitions.

3) Navigate back to GoogleSearchSteps.cs class and paste copied step definitions. 

Use TechTalk.SpecFlow reference to resolve errors. 

To bind the step definitions to feature file, include [Binding] on top of the class.


4) Navigate back to GoogleSearch.feature file to see if binding worked successfully. To navigate to step definition, click on step and press F12. You should be navigated to relevant step definition.


Utilities

Add a folder called Utilities in order to keep classes which keeps supporting methods for the framework. 

1) For starters in utilities folder, first add a class called SeleniumHelper.cs.


2) Add a IWebDriver static variable called driver. Then create a method as given in screenshot. In this project I will be covering executing a sample test on a chrome browser.

In order to launch chrome browser, chrome driver is needed. Download the chrome driver in following chrome driver link based on the chrome web browser version installed on the computer. Then add the folder path until chromedriver.exe in the launchBrowser method.


3) Add the following methods to SeleniumHelper.cs class.

        //maximize browser window
        public static void maximizeBrowser()
        {
            driver.Manage().Window.Maximize();
        }

        //navigate to given url
        public static void navigateToUrl(string url)
        {
            driver.Navigate().GoToUrl(url);

        }

       //return current driver instance
        public static IWebDriver getDriver()
        {
            return driver;

        }

4) Next add a SpecFlow hooks class named Hooks.cs into Utilities folder. SpecFlow hooks class will contain specific tasks that need to be run on certain points when tests are running. (i.e. Execute a set of commands prior to test run)


5) Add an AfterTestRun event in Hooks.cs class and add the command to close the browser.