Friday, March 20, 2020

Cucumber Selenium test automation framework using C# - Part 4 - Implementing step definitions and running tests

Prerequisites


Please complete Part 3 of this tutorial before continuing.


Implementing step definitions


Once project structure is implemented, before running the tests step definitions for each scenario step must be implemented.

1) Navigate to GoogleSearch.feature file and go to Given I've launched Chrome browser step definition.

In this step browser should be launched based on user input. Change the step definition as shown. word chrome is parameterised in step definition and passed to launchBrowser method in SeleniumHelper.cs class.


2) Implement the rest of the step definitions as given below. Leave Then I can see search results step definition as pending for the time being.


3) Please comment the Then I can see search results step in GoogleSearch.feature file as currently it is not required.

Running tests using Test Explorer in Visual Studio


1) Once everything is completed, build the project by selecting Build > Build Solution.

If there aren't any errors, build will be successful.


2) Remove the UnitTest1.cs class from the project as it is not required.


3) In order to run the test in Visual Studio, navigate to Test Explorer. (If Test Explorer is not available, View > Test Explorer will show the Test Explorer window)

Test Explorer will show the available tests. To run the test, right-click on the test and select Run.


If everything goes well, chrome browser will open and test will be executed. Once test is completed, then browser will be closed.


Thursday, March 19, 2020

Cucumber Selenium test automation framework using C# - Part 3 - Creating project structure

Prerequisites


Please complete Part 2 of this tutorial before continuing.


Creating Project Structure


Pages


Since we are using Page Object Model (POM) design pattern in our automation framework, we need to maintain elements and actions of each web page in separate class files. (i.e. If your web application contains 5 different pages, you need to create 5 class files which corresponds to each web page and include all elements and actions for each page)

1) In your solution, create a folder and rename it as Pages. Then create a GoogleHomePage.cs class inside Pages folder. GoogleHomePage.cs class will contain all elements and actions of the GoogleHome page.


2) Import the following libraries to the class.

using OpenQA.Selenium;

using OpenQA.Selenium.Support.PageObjects;

The syntax to be used to define elements

[FindsBy(How = How.XPath, Using = "")]

private IWebElement searchTextBox;

3) Include elements for Search text box and Google Search button in GoogleHomePage.cs class
(For this example I will be using xPath to identify elements)


4) Include actions required in GoogleHomePage.cs class.
(For this example I will be using adding text to search text box and clicking Google Search button)


5) Create a constructor to initialize elements to be identified by the driver.


Features

Feature file is a file which contains one or more scenarios for a particular feature of the system. Feature can be a direct map to a story in a project.

To make maintenance easy, we will create a Features folder in the project and keep all the feature files inside that folder.

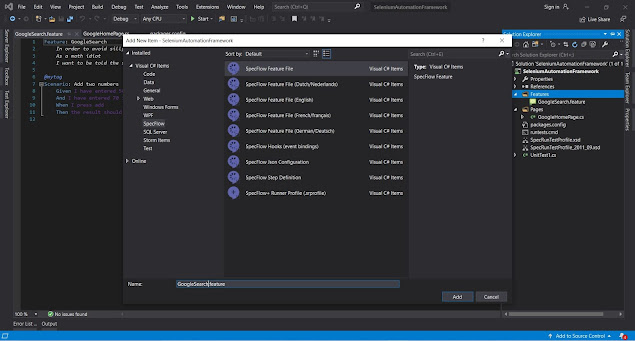
1) In your solution, create a folder and rename it as Features. Then right click on the Features folder > Add New Item > SpecFlow > SpecFlow Feature File to add a new feature file. (i.e. I will add a feature file called 'GoogleSearch.feature')


2) The feature file contains generic text. You can edit the file according to your requirement. However the format must not be changed. 

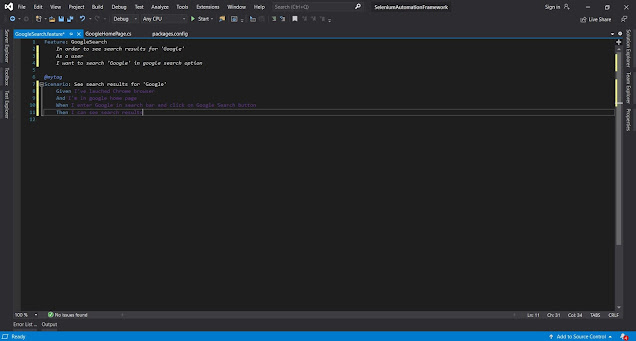
In the GoogleSearch.feature file I want to have the following scenario.

1. Launch Google Chrome browser
2. Navigate to google home page
3. Enter 'Google' in search textbox and click on Google Search button
4. View search results

I have modified GoogleSearch.feature file as given below.


Steps

For every action written in feature file should have a corresponding implementation step to execute the required actions. These steps are included in a steps class. This class is called step definition class. Step definition class can have one or more step implementations. 

Please note that one feature file can connect to step implementations on multiple step definition classes. 

1) To implement step implementations for GoogleSearch.feature, I will add GoogleSearchSteps.cs class inside Steps folder.


2) SpecFlow provides the capability to generate step definitions for each step written in feature file. Navigate to GoogleSearch.feature file > Right Click on any step > Generate Step Definitions.


In the pop-up window, select Copy methods to clipboard option to copy step definitions.

3) Navigate back to GoogleSearchSteps.cs class and paste copied step definitions. 

Use TechTalk.SpecFlow reference to resolve errors. 

To bind the step definitions to feature file, include [Binding] on top of the class.


4) Navigate back to GoogleSearch.feature file to see if binding worked successfully. To navigate to step definition, click on step and press F12. You should be navigated to relevant step definition.


Utilities

Add a folder called Utilities in order to keep classes which keeps supporting methods for the framework. 

1) For starters in utilities folder, first add a class called SeleniumHelper.cs.


2) Add a IWebDriver static variable called driver. Then create a method as given in screenshot. In this project I will be covering executing a sample test on a chrome browser.

In order to launch chrome browser, chrome driver is needed. Download the chrome driver in following chrome driver link based on the chrome web browser version installed on the computer. Then add the folder path until chromedriver.exe in the launchBrowser method.


3) Add the following methods to SeleniumHelper.cs class.

        //maximize browser window
        public static void maximizeBrowser()
        {
            driver.Manage().Window.Maximize();
        }

        //navigate to given url
        public static void navigateToUrl(string url)
        {
            driver.Navigate().GoToUrl(url);

        }

       //return current driver instance
        public static IWebDriver getDriver()
        {
            return driver;

        }

4) Next add a SpecFlow hooks class named Hooks.cs into Utilities folder. SpecFlow hooks class will contain specific tasks that need to be run on certain points when tests are running. (i.e. Execute a set of commands prior to test run)


5) Add an AfterTestRun event in Hooks.cs class and add the command to close the browser.


Tuesday, March 17, 2020

Cucumber Selenium test automation framework using C# - Part 2 - Installing required extensions and packages

Prerequisites


Please complete Part 1 of this tutorial before continuing.

Extensions

The following extensions are required to be installed.

SpecFlow for Visual Studio 2019

1) Once you are in project window, select Extensions > Manage Extensions.


2) Search 'SpecFlow' in search bar to the right. Then click on Download button of SpecFlow for Visual Studio 2019.


3) Close Visual Studio for changes to be applied. In pop-up window, select Modify.


4) Once installation is complete, launch Visual Studio again.

5) Confirm SpecFlow for Visual Studio is installed in the Installed extensions section of Extensions > Manage Extensions.


Packages

The following packages are required to be installed via NuGet Manager


  • Selenium.WebDriver
  • NUnit
  • NUnit3TestAdapter
  • Selenium.Support
  • SpecFlow
  • SpecRun.NUnit
  • SpecFlow.Tools.MsBuild.Generation (Compatible version 3.1.86)
  • ExtentReports


1) Navigate to Tools > NuGet Package Manager > Manage NuGet Packages for Solution.


2) In NuGet - Solution page, you can browse packages, view installed packages and see updates for installed packages.
In the Browse section search for the required NuGet package. (i.e. Selenium.WebDriver)


3) Click on the required NuGet package from the search results, select current project and complete installation. Check Output window to see if package is installed successfully.


Cucumber Selenium test automation framework using C# - Part 1 - Setting up Project

If you are testing a web-based application, test automation helps you build up a comprehensive automation test suite that can be used as a regression suite.

The following tutorial is about setting up ground work for developing an automation framework on testing web applications which later you can integrate to CI/CD pipeline.

Getting Started


1) Before start developing the test framework, you need to have Visual Studio installed on your computer. You can follow my Installing Visual Studio Community Edition on Windows 10 guide to install Visual Studio Community Edition.

2) Once you have successfully installed Visual Studio Community Edition, launch the application.

Creating a project


1) Once you have launched Visual Studio Community Edition, select Create a new project to start creating your test automation framework project.


2) In the next screen, select C# Unit Test Project.


3) In the next screen, give an appropriate name to your project, select the location you want to save the project. Then click on Create.


4) Then you will be directed to the following screen.


Monday, March 16, 2020

Installing Visual Studio Community Edition on Windows 10

1) Click on the following link.

2) Select Free Download button under Community. (Latest version at the time of writing this article)


3) Once .exe file is downloaded, run the file. Complete the steps as prompted. Then in the following screen, select the required packages to install. (ASP.NET and web development and .NET desktop development are preferred)


4) In the next screen, click on "install" button to continue.


5) Once installation is complete, launch Visual Studio 2019 Community Edition by clicking Visual Studio 2019 from start menu